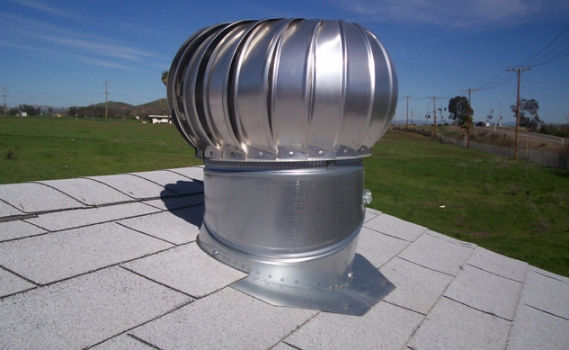
Galvanized turbine on roof.
ATTIC VENTILATION
QUOTE HOTLINE: 403-907-0346
Ensuring proper ventilation in your attic is paramount to maximizing the life of all the construction elements in your roof/ceiling. Moist hot air can damage your roof shingles, it can cause ice damming, it can damage your insulation, promote the growth of mould, and even damage the roof truss framing members themselves. To ensure proper air flow, you need intake somewhere low on the roof line, and exhaust somewhere near the peak. This can be achieved in many ways, depending on the age of your home and the style that was employed in framing the roof system.
Ideally, you want outside air to enter at your soffits (see above diagram) and travel along the underside of your roof sheathing, and exit near the peak of your roof, through a roof vent. For the vast majority of older homes that we encounter, there is a solid plywood soffit, with no intake vents, and a single roof vent. This is a dangerous situation. Discuss the options with your contractor.
One of our favorite solutions is to install several roof vents, on each side of the roof, low on the roof line. Then install one or two whirlybird turbines at the peak of the attic. This will create the ideal convective process whereby air is drawn in, heats up (because your attic can be as much as 55 C in August), then is expelled through the turbine at high speed (this is actually what makes the turbine spin — not just wind).
Note: Supplied and installed products may differ from the images below (for reference purposes only)
PLEASE NOTE: There are roof types that we cannot operate on. Typically two stories or any high slope roof that would require fall arrest. We suggest you engage a roofing company to complete these installs. We do not install roof venting products on their own, only in concert with attic insulation upgrades. Thank you for your understanding.
WHIRLYBIRD TURBINES
Galvanized whirlybird turbines are a very effective way of expelling hot, moist air from your attic. They work on a convective process where hot air is drawn from your intake, and expelled out the peak, through the turbine, at high speed.
When your turbine is spinning, you know air is being exhausted from your attic. Make sure you don’t cheap out on your turbine, and get one (such as the whirlybird brand) that has ball bearings instead of a plastic sleeve. They last longer, and are less likely to make noise and get off balance.
We offer a full two year warranty on the installation and the manufacturer has a lifetime warranty on the build of our turbines.
SOFFIT AIR CHUTES
Air chutes installed with "old" cellulose
Air Chutes, also known as “air baffles” can be very effective if installed under the right circumstances. If you have under eave intake venting, and no insulation stops (the cardboard variety), then you should install Styrofoam air chutes. Another situation that would required them, is if you have a very low slope roof, and the insulation stops were not sufficiently long to keep your new insulation levels from plugging your intake vents. This is very rare, but it does occur, and air chutes can be used to extend your existing insulation stops. Air chutes are installed on the inside of the attic, over the roof truss framing members. They form a protected air flow zone between your roof sheathing, and the chute itself. This protected zone allows fresh intake air to flow in through your intake vent, and rise up to the roof line, and out your vents or turbine.
PASSIVE ROOF VENTS
Roof vents are pretty much standard on just about every home. They allow warm moist air to escape out of the top of your roof. They are entirely necessary and every home should have them. The exception would be homes with sufficient gable vents (on the wall of your attic at either or both ends) or specialty venting such as continuous ridge venting.
Bear in mind that the effectiveness of the roof vent, will be dependant on your attic having enough air intake, either lower on your roof line, or preferably at the underside of your eaves.


